Technique thursday -The dc project, Episode 6 (dc between sts, linked dc and extended dc)

Let’s explore today more variations on the DOUBLE CROCHET:
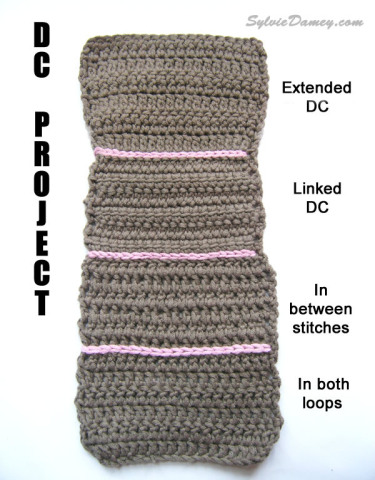
– starting again with the dc in both loops as refence
– dc in between stitches
– linked dc
– extended dc
First, choose your yarn. No fun fur or boucl� yarn, you want neat stitch definition for this project.
I’m using the long-discontinued Rowan “All seasons cotton”
You’ll also want to have enough of this yarn to make ALL the samples of the series. I’d say have at least 200 m…
Choose a hook which works well with this yarn: crocheted fabric should be not too tight, not too loose. I’m using a 5 mm (H) Tulip Etimo “Rose” hook (starting the test of all those hooks)
Step 1 – REGULAR DC = DC IN BOTH LOOPS
Let’s start our sampler with 6 rows of DC in both loops as a reference to compare the other stitches to.

Chain 22.
Turn and work a double crochet (dc) in 4th chain from hook. Then dc in each chain across. Turn work. You should have 20 sts (including initial ch3, which counts as 1st st. I know there are options for this, but let’s keep this for later)
We’re now going to insert the hook under BOTH loops of each stitch: when you look the top of the stitches, you see a “V” sitting on top of each dc. Both legs of the V = both loops.

You have now 6 rows of dc in both loops. Mark last row of dc in back loop with a stitch marker.
Step 2 – DC IN BETWEEN STITCHES

To work this first variation of the dc, let’s insert the hook NOT under both legs of the V sitting at top of each st, but BETWEEN the posts of the dc in previous row.
Let’s see how:

Start with chain 3,

Yarnover and insert hook between the first (located under the ch3) and 2nd DC posts from from row below, and work a regular double crochet…

You’ve just made your first DC in between stitches. Arrows show where hook was inserted for first dc, and where to insert hook for the next 2 …

For next dc, insert hook in between 2nd and 3rd dc post from row below

And continue likewise on rest of row…

Side note – If you have a look at the Wrong Side of work, you’ll see that working in between stitches creates bulkiness over the base of stitches: when working between the posts of row below, you actually encapsulate all 3 strands of yarn together. To me, it nearly looks like weaving… What do you think ?

To end row, make sure you don’t miss the last st: insert hook between last-but-one post and last post from row below.

Continue likewise for the next 5 rows. You end up with 6 rows total of DC in between stitches.
Mark last row of dc in between stitches with a stitch marker.
Step 3 – LINKED DOUBLE CROCHET

We are now going to make Double Crochets which are, as indicated by their name, linked together. With this stitch, there will be hardly any gap in between the stitches.
In order to achieve this, we’ll “replace” the very first yarnover by a slip stitch in one area of the previous dc. This will link together the stitches, as if the Double Crochets were holding hands tightly.

Start with chain 3.

Insert hook in 2nd of the 3 chains,

And work a slip stitch. You have 2 loops on hook.
Important : This slip stitch will “replace” the initial yarnover of next dc !

Now for next dc, ** do not yarnover, but insert hook directly under both loops of next st,

yarnover and pull through (3 loops on hook),

yarnover and pull through 2 loops (you have 2 loops on hook),

Finally, yarnover and pull through last 2 loops on hook. YOu have finished the first linked dc. (1 loop on hook)

Now to start the 3rd linked dc: Watch closely the linked dc just worked. Can you see the horizontal bar about halfway up ?

Insert hook from top to bottom in this loop,

1 slip stitch in this loop,


and repeat from ** to make the next linked dc.

You now have 3 linked double crochets.

Repeat the procedure to end of row,

And make sure you work the last st in top of the chain 3 from row below, at the end of row.

Repeat until you have 6 rows total.
Mark last row of linked dc with a stitch marker.
I don’t know about you… but to me, this nearly looks like crocheting 2 rows of single crochet in 1 row of double crochet. Weird, right ?
Anyhow, you may find that the rows are more difficult to differentiate when counting them. And this time, you cannot separate the sts to count the posts either ! (count the Vs at top of row)
To count the rows, I refered to the horizontal line halfway up the row, on the Right Side.
Step 4 – EXTENDED DOUBLE CROCHET

Now, let’s work double crochets which are taller (elongated) than usual. To do this, we’ll very simply add a chain somewhere along the way while making the dc…

Start with chain 3, then * yarnover and insert hook under both loops of next st,

Pull through, ( 3 loops on hook)

And BAM: here’s where it changes ! Chain 1 (still 3 loops on hook)

yarnover and pull through 2 loops (2 loops on hook)

yarnover and pull through last 2 loops.** You have finished your first extended dc.

Repeat from * to ** across row.

Continue to work in extended dc until you have a total of 6 rows.
Do not fasten off yet, as I have a little something left in store…
Now. Those extended double crochets look quite similar to regular dc (= in both loops) except that they’re taller.
I don’t know about you, but I’ve been wondering: how tall are those ? Taller than Treble Crochets ?
Let’s double check this in a minute: before you cut the yarn, try to make a few Extended dc, followed by a few Treble crochets:

Pfew ! Treble crochets remain taller than extended dc.
This may be a good thing to remember, when working a panel of stitches of different heights (like I did for the Loup jacket, or the Babouches for instance…): In between the Double and Treble crochet stitches, the extended dc fits just nicely !
Etape 5 – S�parer visuellement chaque partie
Bravo, you’ve now finished this fourth sampler !
Just as we did for the other samplers, let’s separate each section by a line of surface crochet, using the stitch markers to visualize where to stitch.

Holding working yarn UNDER work (= on WS), work in loose slip stitch so as not to alter width of sampler. Fasten Off.
Finally, admire your sampler ! Can you spot any difference between all those variations of the dc, or decide which best use could be applied to each variation ?
Now it’s your turn: share your pictures of your sampler so I can add them in the Collective Album on my Facebook page !
(one lucky winner will receive a Tulip Etimo Rose hook once the project is finished)
See you next week to share our conclusions on the stitches from this Episode !
********************
DC project Episode 1
DC project Episode 2
DC project Episode 3
DC project Episode 4
DC project Episode 5
DC project Episode 6

2 Comments »
RSS feed for comments on this post. TrackBack URI
Leave a comment
Line and paragraph breaks automatic, e-mail address never displayed, HTML allowed: <a href="" title=""> <abbr title=""> <acronym title=""> <b> <blockquote cite=""> <cite> <code> <del datetime=""> <em> <i> <q cite=""> <s> <strike> <strong>
November 19th, 2016 @ 6:10 am
Only just found this but I am definitely going to do these tutorials. They are fantastic and thank you very much for sharing these.
November 20th, 2016 @ 11:00 am
OH thanks, glad you appreciate and hope you’ll enjoy trying each version of the dc :-)